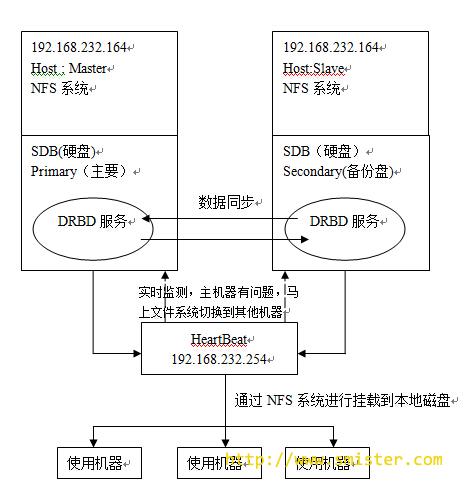
heartbeat的作用就可以增加drbd的可用性,它能在某节点故障后,自动切换drbd块到备份节点,并自动进行虚IP从新绑定,DRBD块提权,磁盘挂载以及启动NFS等脚本操作,这一系列操作因为只在他后端节点间完成,前端用户访问的是heartbeat的虚IP,所以对用户来说无任何感知。
一、配置DBRS ,请查看DBRS配置篇 ,就在下面
二、Heartbeat配置
1、 安装heartbeat(CentOS6.3中默认不带有Heartbeat包,因此需要从第三方下载
    (Master , Slave 同样操作)
    [root@localhost ~]#wget ftp://mirror.switch.ch/pool/4/mirror/scientificlinux/6rolling/i386/os/Packages/epel-release-6-5.noarch.rpm
    //如果版本找不到 , 可以到ftp://mirror.switch.ch/pool/选择新的版本
    [root@localhost ~]#rpm –ivUh epel-release-6-5.noarch.rpm
    [root@localhost ~]#yum –enablerepo=epel install heartbeat –y
2、 配置beartbeat
(Master)
1) 配置ha.cf配置文件
[root@localhost ~]#vim /etc/ha.d/ha.cf
        #日志
        logfile         /var/log/ha-log
        logfacility     local0

        #心跳检测时间
        keepalive       2

        #死亡四件
        deadtime        6

        #制定对方IP , 这里的网卡需要对应
        ucast           eth0 192.168.232.165

        #服务器正常后由主服务器接口资源 , 另一台放弃资源
        auto_failback   off

        #自定义节点
        node Master Slave
2)认证文件authkeys用于配置心跳的加密方式,该文件主要是用于集群中两个节点的认证,采用的算法和密钥在集群中节点上必须相同,目前提供了3种算法:md5,sha1和crc。其中crc不能够提供认证,它只能够用于校验数据包是否损坏,而sha1,md5需要一个密钥来进行认证。
        [root@localhost ~]# vim /etc/ha.d/ha.cf
        [root@localhost ~]# dd if=/dev/random bs=512 count=1 | openssl md5
        0+1 records in
        0+1 records out
        20 bytes (20 B) copied, 0.000126508 s, 158 kB/s
        (stdin)= 12f3afe7de1c1a9948444feeacf11479  //获得的md5加密的随机码

        [root@localhost ~]# vim /etc/had.d/authkeys
        auth 3
        3 md5 12f3afe7de1c1a9948444feeacf11479

        //authkeys文件需要更改权限为600 , 否则heartbeat启动会失败
        [root@localhost ~]#chmod 600 /etc/had.d/authkeys
3)生成集群资源文件haresource
        [root@localhost ~]# vim /etc/ha.d/haresources
        Master IPaddr::192.168.232.254/24/eth0 drbddisk::r0 Filesystem::/dev/drbd0::/data::ext3 killnfsd
注:
该文件内IPaddr,Filesystem等脚本存放路径在/etc/ha.d/resource.d/下,也可在该目录下存放服务启动脚本(例如:mysql,www),将相同脚本名称添加到/etc/ha.d/haresources内容中,从而跟随heartbeat启动而启动该脚本。
IPaddr::192.168.7.90/24/eth0:用IPaddr脚本配置浮动VIP
drbddisk::r0:用drbddisk脚本实现DRBD主从节点资源组的挂载和卸载
Filesystem::/dev/drbd0::/data::ext3:用Filesystem脚本实现磁盘挂载和卸载
生成killnfsd文件 , 如果不存在nfs系统请运行yum install nfs -y
        [root@localhost ~]#vim /etc/ha.d/resource.d/killnfsd
        killall -9 nfsd ; /etc/init.d/nfs restart;exit 0;
        [root@localhost ~]#chmod 755 /etc/ha.d/resource.d/killnfsd
4)生成drbddisk启动脚本
[root@localhost ~]# vim /etc/ha.d/resource.d/drbddisk
        [root@localhost ~]# vim /etc/ha.d/ha.cf
        [root@localhost ~]# dd if=/dev/random bs=512 count=1 | openssl md5
        0+1 records in
        0+1 records out
        20 bytes (20 B) copied, 0.000126508 s, 158 kB/s
        (stdin)= 12f3afe7de1c1a9948444feeacf11479  //获得的md5加密的随机码

        [root@localhost ~]# vim /etc/had.d/authkeys
        auth 3
        3 md5 12f3afe7de1c1a9948444feeacf11479

        //authkeys文件需要更改权限为600 , 否则heartbeat启动会失败
        [root@localhost ~]#chmod 600 /etc/had.d/authkeys

    #!/bin/bash
    #
    # This script is inteded to be used as resource script by heartbeat
    #
    # Copright 2003-2008 LINBIT Information Technologies
    # Philipp Reisner, Lars Ellenberg
    #
    ###

    DEFAULTFILE="/etc/default/drbd"
    DRBDADM="/sbin/drbdadm"

    if [ -f $DEFAULTFILE ]; then
        . $DEFAULTFILE
    fi

    if [ "$#" -eq 2 ]; then
        RES="$1"
        CMD="$2"
    else
        RES="all"
        CMD="$1"
    fi

    ## EXIT CODES
    # since this is a "legacy heartbeat R1 resource agent" script,
    # exit codes actually do not matter that much as long as we conform to
    #  http://wiki.linux-ha.org/HeartbeatResourceAgent
    # but it does not hurt to conform to lsb init-script exit codes,
    # where we can.
    #  http://refspecs.linux-foundation.org/LSB_3.1.0/
    #LSB-Core-generic/LSB-Core-generic/iniscrptact.html
    ####

    drbd_set_role_from_proc_drbd()
    {
        local out
        if ! test -e /proc/drbd; then
            ROLE="Unconfigured"
            return
        fi

        dev=$( $DRBDADM sh-dev $RES )
        minor=${dev#/dev/drbd}

        if [[ $minor = *[!0-9]* ]] ; then
            # sh-minor is only supported since drbd 8.3.1
            minor=$( $DRBDADM sh-minor $RES )
        fi

        if [[ -z $minor ]] || [[ $minor = *[!0-9]* ]] ; then
            ROLE=Unknown
            return
        fi

        if out=$(sed -ne "/^ *$minor: cs:/ { s/:/ /g; p; q; }" /proc/drbd); then
            set -- $out
            ROLE=${5%/**} : ${ROLE:=Unconfigured} # if it does not show up
        else
            ROLE=Unknown
        fi

    }

    case "$CMD" in
        start)
        # try several times, in case heartbeat deadtime
        # was smaller than drbd ping time

        try=6
        while true; do
            $DRBDADM primary $RES && break
            let "--try" || exit 1 # LSB generic error
            sleep 1
        done

        ;;
        stop)
        # heartbeat (haresources mode) will retry failed stop
        # for a number of times in addition to this internal retry.

        try=3
        while true; do
            $DRBDADM secondary $RES && break

            # We used to lie here, and pretend success for anything != 11,
            # to avoid the reboot on failed stop recovery for "simple
            # config errors" and such. But that is incorrect.
            # Don't lie to your cluster manager.
            # And don't do config errors...

            let --try || exit 1 # LSB generic error
            sleep 1
        done
        ;;
        status)
            if [ "$RES" = "all" ]; then
                echo "A resource name is required for status inquiries."
                exit 10
            fi

            ST=$( $DRBDADM role $RES )
            ROLE=${ST%/**}

            case $ROLE in
                Primary|Secondary|Unconfigured)
                # expected
            ;;

            *)
                # unexpected. whatever...
                # If we are unsure about the state of a resource, we need to
                # report it as possibly running, so heartbeat can, after failed
                # stop, do a recovery by reboot.
                # drbdsetup may fail for obscure reasons, e.g. if /var/lock/ is
                # suddenly readonly.  So we retry by parsing /proc/drbd.

                drbd_set_role_from_proc_drbd
            esac

            case $ROLE in
                Primary)
                    echo "running (Primary)"
                    exit 0 # LSB status "service is OK"
                    ;;

                Secondary|Unconfigured)
                    echo "stopped ($ROLE)"
                    exit 3 # LSB status "service is not running"
                    ;;

                    *)
                        # NOTE the "running" in below message.
                        # this is a "heartbeat" resource script,
                        # the exit code is _ignored_.
                        echo "cannot determine status, may be running ($ROLE)"
                        exit 4 #  LSB status "service status is unknown"
                    ;;
            esac
            ;;

         *)
            echo "Usage: drbddisk [resource] {start|stop|status}"
            exit 1
            ;;

    esac
    exit 0
[root@localhost ~]# chmod 755 /etc/ha.d/resource/drbddisk
5)将上面新建的文件复制给Slave文件
        [root@localhost ~]# scp /etc/ha.d/ha.cf root@192.168.232.165:/etc/ha.d/
        [root@localhost ~]# scp /etc/had.d/authkeys root@192.168.232.165:/etc/ha.d/
        [root@localhost ~]# scp /etc/ha.d/haresources root@192.168.232.165:/etc/ha.d/
        [root@localhost ~]# scp /etc/ha.d/resource.d/drbddisk root@192.168.232.165:/etc/ha.d/resource/
(以下是Slave操作)
6)更改Master传过来的文件 , 到那时只改ha.cf就可以了
         [root@localhost ~]# vim  /etc/ha.d/ha.cf
        //以后一下的内容就好
        Ucast      eth0 192.168.232.165
三、启动heartbeat并测试
        (Master , Slave操作)
        1、启动
        [root@localhost ~]# service heartbeat start
        [root@localhost ~]# chkconfig heartbeat on

2、  测试 , ping heartbeat中生成的虚拟ip是否成功
        [root@localhost ~]# ping 192.168.232.254
四、配置NFS
        (Master , Slave操作)
        [root@localhost ~]# vim /etc/exports/data
        *(rw,no_root_squash)

        //重启NFS服务
        [root@localhost ~]# service rpcbind restart
        [root@localhost ~]# service nfs restart
        [root@localhost ~]# chkconfig rpcbind on
        //开机不启动nfs , 因为启动heartbeat的脚本就已经启动nfs了
        [root@localhost ~]# chkconfig nfs off
五、测试
在另外一台linux客户端中挂载虚ip : 192.168.232.254 , 挂载成功表示整个实验成功了
这里我就在slave测试
1)挂载nfs系统
        [root@localhost ~]# mkdir /test
        [root@localhost ~]# mount –t nfs 192.168.232.254:/data /test
        [root@localhost ~]# df –h
        [root@localhost ~]# cd /test
        [root@localhost ~]# ls
        //如果刚刚测试的数据都在 , 证明OK了
        [root@localhost ~]#touch ttt
        //测试能不能写入
2)测试当primary挂掉时 , 看备份的机子成功接管Primary
        (Master操作)
        [root@localhost ~]# init 0

        (Slave操作)
        [root@localhost ~]# service drbd status
        //如果出现提升为primary证明系统成功切换
        [root@localhost ~]# cd test
        //再来回查挂载的系统能不能使用
版权声明:未经博主允许不得转载。http://smister.com/post-25.html